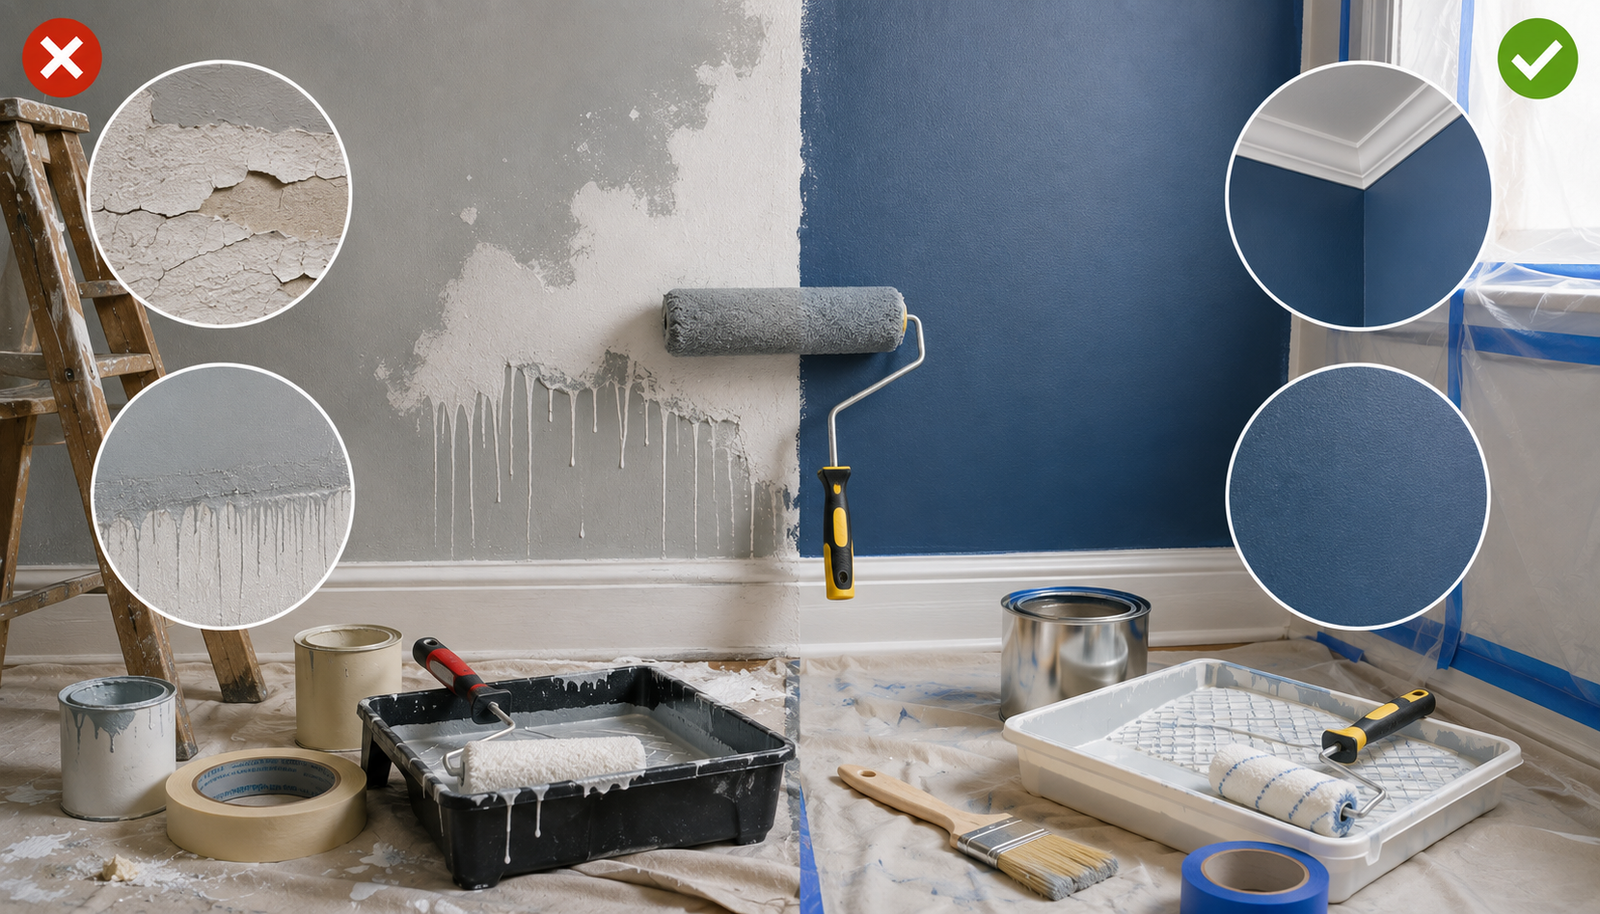
Painting looks deceptively simple, roll paint onto a wall, let it dry, done. But common painting mistakes show up in nearly every DIY project, drips, uneven coverage, visible brush marks, or paint that starts peeling within months rather than lasting years. Most of these problems trace back to a handful of recurring, entirely avoidable errors in preparation, technique, or timing.
This guide walks through the mistakes DIY painters make most often, why they happen, and exactly how to avoid them, so your next paint job looks genuinely professional rather than showing every shortcut along the way.
Common Painting Mistakes to Avoid
The most common painting mistakes fall into three categories: skipping or rushing surface preparation, using poor technique during application (overloading the brush or roller, painting in the wrong direction, working too slowly and creating visible lap marks), and mismanaging timing, either rushing between coats or removing tape too early or too late. Slowing down at each of these stages, prep, application, and drying, prevents the overwhelming majority of painting problems before they ever show up on your wall.
Preparation Mistakes
1- Skipping Surface Cleaning
Painting directly over a dusty, greasy, or dirty wall prevents paint from adhering properly, often resulting in a patchy finish or premature peeling once the paint fully cures.
How to avoid it: Clean walls with a mild detergent solution before painting, paying particular attention to kitchens and bathrooms where grease and grime accumulate more readily than in other rooms.
2- Not Repairing Holes and Cracks First
Painting directly over small holes, dents, or cracks doesn’t hide them, it often makes them more visible once the paint dries, particularly with higher-sheen finishes that highlight surface imperfections.
How to avoid it: Fill holes and cracks with spackle or wall filler, sand smooth once dry, and prime the repaired area before painting over it.
3- Skipping Primer When It’s Genuinely Needed
Painting over bare drywall, a significantly darker existing color, or a glossy surface without primer often results in uneven coverage, poor adhesion, or colors that don’t look true to what you intended.
How to avoid it: Use a dedicated primer for bare surfaces, major color changes, and glossy substrates, rather than relying on paint alone to handle these transitions effectively.
4- Not Removing or Sanding Glossy Finishes
Painting directly over an existing glossy surface without any surface preparation gives new paint very little texture to grip onto, increasing the risk of peeling later.
How to avoid it: Lightly sand glossy surfaces to create texture (called “scuffing”) before priming and painting, improving adhesion considerably.
Taping and Masking Mistakes
5- Using Low-Quality Tape
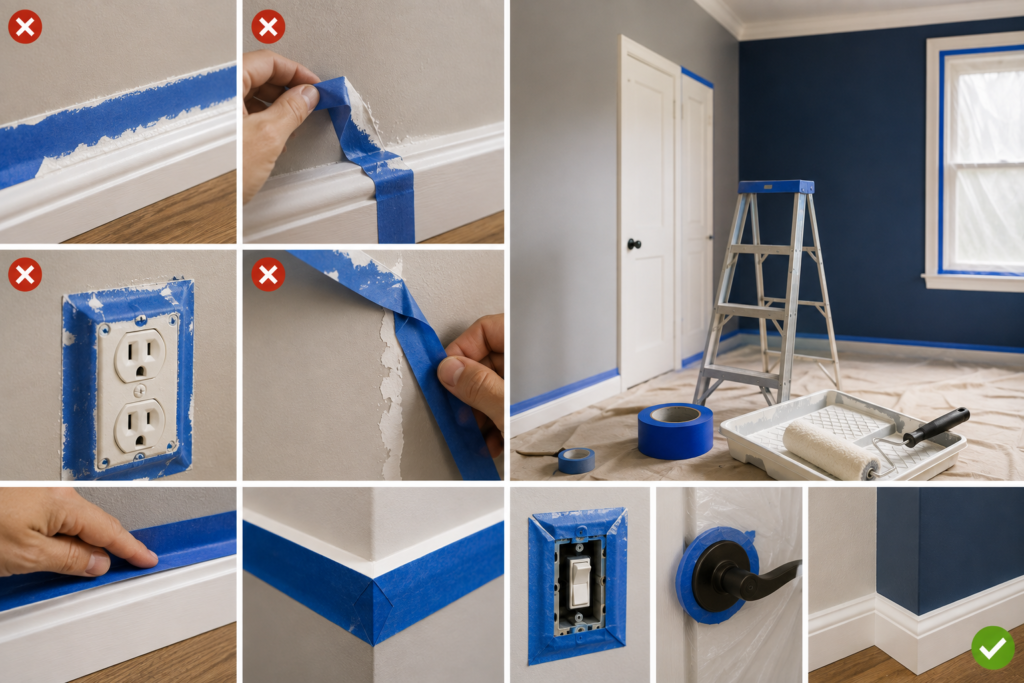
Cheap painter’s tape can allow paint to seep underneath, resulting in blurry, imprecise lines rather than the clean edges tape is meant to create.
How to avoid it: Invest in quality painter’s tape and press it down firmly along its entire length, ensuring full contact with the surface to prevent bleed-through.
6- Removing Tape at the Wrong Time
Removing tape too early, while paint is still wet, can smudge fresh paint. Removing it too late, after paint has fully cured, risks pulling up dried paint along with the tape.
How to avoid it: Remove tape when paint is dry to the touch but not yet fully cured, generally within the specific window noted on your paint product, pulling at a 45-degree angle away from the painted surface.
7- Forgetting to Protect Fixtures and Hardware
Light switches, outlet covers, door hardware, and other fixtures often get accidentally painted when they’re not properly covered or removed beforehand.
How to avoid it: Remove switch plates and outlet covers where possible, or use tape to fully cover hardware you can’t easily remove before starting.
Application Technique Mistakes
8- Overloading the Brush or Roller
Applying too much paint at once leads to drips, runs, and an uneven, overly thick application that takes considerably longer to dry properly and is more prone to visible texture problems once cured.
How to avoid it: Load your brush or roller with a moderate, even amount of paint, removing excess against the side of the can or roller tray edge before applying to the wall.
9- Painting in the Wrong Direction or Pattern
Random, inconsistent brush or roller strokes can create visible texture and uneven coverage, particularly noticeable once the paint dries and catches light differently across the wall.
How to avoid it: Use consistent, overlapping strokes in a “W” or “N” pattern with a roller, then fill in without lifting the roller until that section is evenly covered, working in manageable sections rather than the entire wall at once.
10- Working Too Slowly and Creating Lap Marks
Lap marks appear when one section of wet paint starts to dry before the adjacent section is painted, creating visible overlapping edges once everything cures. This commonly happens when painters work too slowly or take extended breaks mid-wall.
How to avoid it: Maintain a “wet edge,” working efficiently enough that each new section overlaps into still-wet paint from the previous section, avoiding long, uninterrupted breaks in the middle of a single wall.
11- Not Cutting In Properly Before Rolling
Skipping careful edge work (cutting in) along ceilings, trim, and corners before rolling the main wall area often results in an uneven, unprofessional-looking border where the roller couldn’t fully reach.
How to avoid it: Cut in edges carefully with an angled brush first, then roll the main wall area while the cut-in edges are still wet, helping blend the brush and roller textures together seamlessly.
Common Application Mistakes at a Glance
| Mistake | Result | Fix |
| Overloading brush/roller | Drips, runs, uneven thickness | Load moderately, remove excess before applying |
| Random stroke direction | Visible texture, streaking | Use consistent overlapping patterns |
| Working too slowly | Lap marks, visible seams | Maintain a wet edge, work efficiently |
| Skipping cut-in step | Uneven borders near trim/ceiling | Cut in with a brush before rolling |
| Painting over dirty walls | Poor adhesion, patchy finish | Clean walls before painting |
| Skipping primer when needed | Uneven coverage, peeling | Prime bare, dark, or glossy surfaces |
Paint Peeling Causes and How to Prevent Them
Poor Surface Preparation
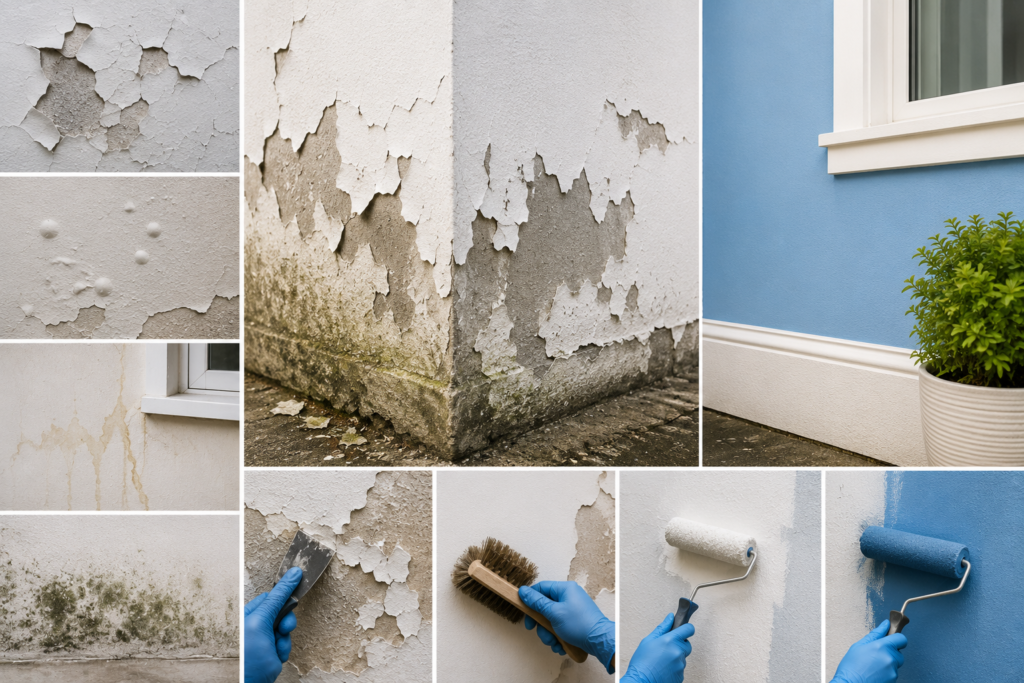
The single most common cause of premature paint peeling is inadequate surface prep, painting over dirt, grease, moisture, or glossy surfaces without proper cleaning, sanding, or priming.
How to avoid it: Always clean, repair, and prime surfaces as needed before painting, rather than skipping these steps to save time.
Painting Over Moisture
Applying paint to a damp or recently wet surface traps that moisture beneath the paint film, often leading to bubbling, blistering, or peeling once the trapped moisture eventually tries to escape.
How to avoid it: Ensure surfaces are completely dry before painting, and address any underlying moisture issues (like a bathroom ventilation problem or exterior water intrusion) before repainting an area that’s peeled due to moisture.
Using Incompatible Paint Types
Applying latex paint directly over an oil-based paint without proper preparation, or vice versa, can lead to poor adhesion and eventual peeling, since these formulations don’t always bond well to each other without an intermediate bonding primer.
How to avoid it: Identify your existing paint type before repainting, and use an appropriate bonding primer when transitioning between different paint formulations.
Applying Paint in Poor Weather Conditions (Exterior)
For exterior painting specifically, applying paint in excessive heat, direct hot sun, or high humidity can cause the paint film to dry too quickly or unevenly, leading to poor adhesion and premature peeling or cracking.
How to avoid it: Check the paint manufacturer’s recommended temperature and humidity range, and plan exterior painting for mild, dry conditions whenever possible.
How to Avoid Paint Drips
Why Drips Happen
Drips form when too much paint is applied to a single area, particularly common along the top or bottom edges of a wall, around corners, or when a loaded brush or roller isn’t properly distributed before application.
Prevention Techniques
Load your brush or roller with a moderate amount of paint rather than fully saturating it, and always do a final, light pass over freshly painted sections to smooth out and redistribute any excess paint before it has a chance to run.
Catching Drips Before They Dry
Check your work periodically while the paint is still wet, particularly along edges and corners where drips are most likely to form, smoothing them out immediately with a light brush or roller pass rather than waiting until the paint has already begun to set.
Timing Mistakes
Applying a Second Coat Too Soon
Painting a second coat before the first has properly dried can pull up the still-wet first layer, create an uneven, streaky finish, or trap moisture beneath the surface.
How to avoid it: Follow the specific paint product’s recommended recoat time, generally listed on the can, rather than assuming a coat is ready simply because it looks dry to the touch.
Rushing Furniture and Fixture Replacement
Moving furniture back into place or reattaching hardware and fixtures too soon after painting, before the paint has fully cured (which takes considerably longer than simply feeling dry to the touch), can cause dents, marks, or sticking.
How to avoid it: Allow paint to fully cure, generally several days to a couple of weeks depending on the specific product, before subjecting painted surfaces to heavy contact or friction.
Color and Sheen Mistakes
Not Testing Color Before Full Application
Committing to a full room based only on a small paint chip or online preview, without testing an actual sample directly on the wall, often leads to an unwelcome surprise once the color is fully applied under your room’s actual lighting.
How to avoid it: Always test paint samples directly on your walls, observed across different times of day, before committing to full-room application.
Using the Wrong Sheen for the Room
Choosing a sheen not suited to a room’s actual traffic or moisture level, flat paint in a bathroom, or semi-gloss on walls with significant imperfections, leads to premature wear or an unintentionally flawed-looking finish.
How to avoid it: Match sheen to each room’s specific traffic and moisture needs, rather than defaulting to a single finish throughout the entire home.
Cleanup and Finishing Mistakes
Not Cleaning Brushes and Rollers Properly
Leaving paint to dry in brushes or roller covers ruins them for future use, requiring replacement rather than simply cleaning and reusing quality tools across multiple projects.
How to avoid it: Clean brushes and rollers promptly after each painting session, using warm soapy water for latex paint or an appropriate solvent for oil-based paint.
Improper Paint Disposal
Pouring leftover paint down a drain or simply discarding it in regular household trash isn’t appropriate disposal for most paint products and may violate local regulations.
How to avoid it: Check your local municipality’s guidelines for paint disposal, many areas have specific collection programs or drop-off locations for leftover paint and related materials.
Common Mistakes to Avoid
- Skipping surface cleaning and repair, leading to poor adhesion and visible imperfections
- Using low-quality tape or removing it at the wrong time, resulting in blurry lines or pulled-up paint
- Overloading the brush or roller, causing drips and uneven coverage
- Working too slowly and creating lap marks, rather than maintaining a consistent wet edge
- Applying a second coat too soon, pulling up the still-wet first layer
- Skipping color testing before full application, risking an unwelcome surprise on the final result
Conclusion
Most common painting mistakes trace back to rushing through preparation, technique, or timing, steps that feel optional in the moment but genuinely determine whether your finished paint job looks professional and lasts for years. Taking the time to properly clean and prep surfaces, use quality tape and application technique, and respect proper drying and curing times addresses the overwhelming majority of issues before they ever show up on your walls. With these habits in place, you’ll spend considerably less time troubleshooting drips, peeling, or uneven coverage, and get results that genuinely reflect the effort you put into the project.
Frequently Asked Questions
1- What causes paint to peel after a relatively short time?
Poor surface preparation, painting over dirt, grease, or moisture, is the most common cause, along with using incompatible paint types or applying paint in poor weather conditions for exterior projects.
2- How do I avoid drips when painting?
Load your brush or roller with a moderate amount of paint rather than fully saturating it, and check your work periodically while still wet, smoothing out any drips immediately before they set.
3- Why does my paint look streaky or uneven?
This often results from working too slowly and creating lap marks, or from inconsistent stroke direction and pattern. Maintaining a consistent wet edge and using overlapping strokes helps prevent this.
4- How long should I wait between paint coats?
Follow the specific paint product’s recommended recoat time, listed on the can, rather than assuming a coat is ready simply because it appears dry to the touch.
5- When should I remove painter’s tape?
Generally when the paint is dry to the touch but not yet fully cured, pulling the tape away at a 45-degree angle to help achieve the cleanest possible line.
6- Why does my paint color look different than I expected?
This is often due to not testing an actual sample directly on your wall before committing to full application, since lighting and wall surface can significantly change how a color reads compared to a small chip or online preview.
7- Do I need to sand glossy paint before repainting over it?
Yes, lightly sanding a glossy surface creates texture that helps new paint adhere properly, reducing the risk of peeling that can occur when painting directly over a slick, glossy finish without any preparation.