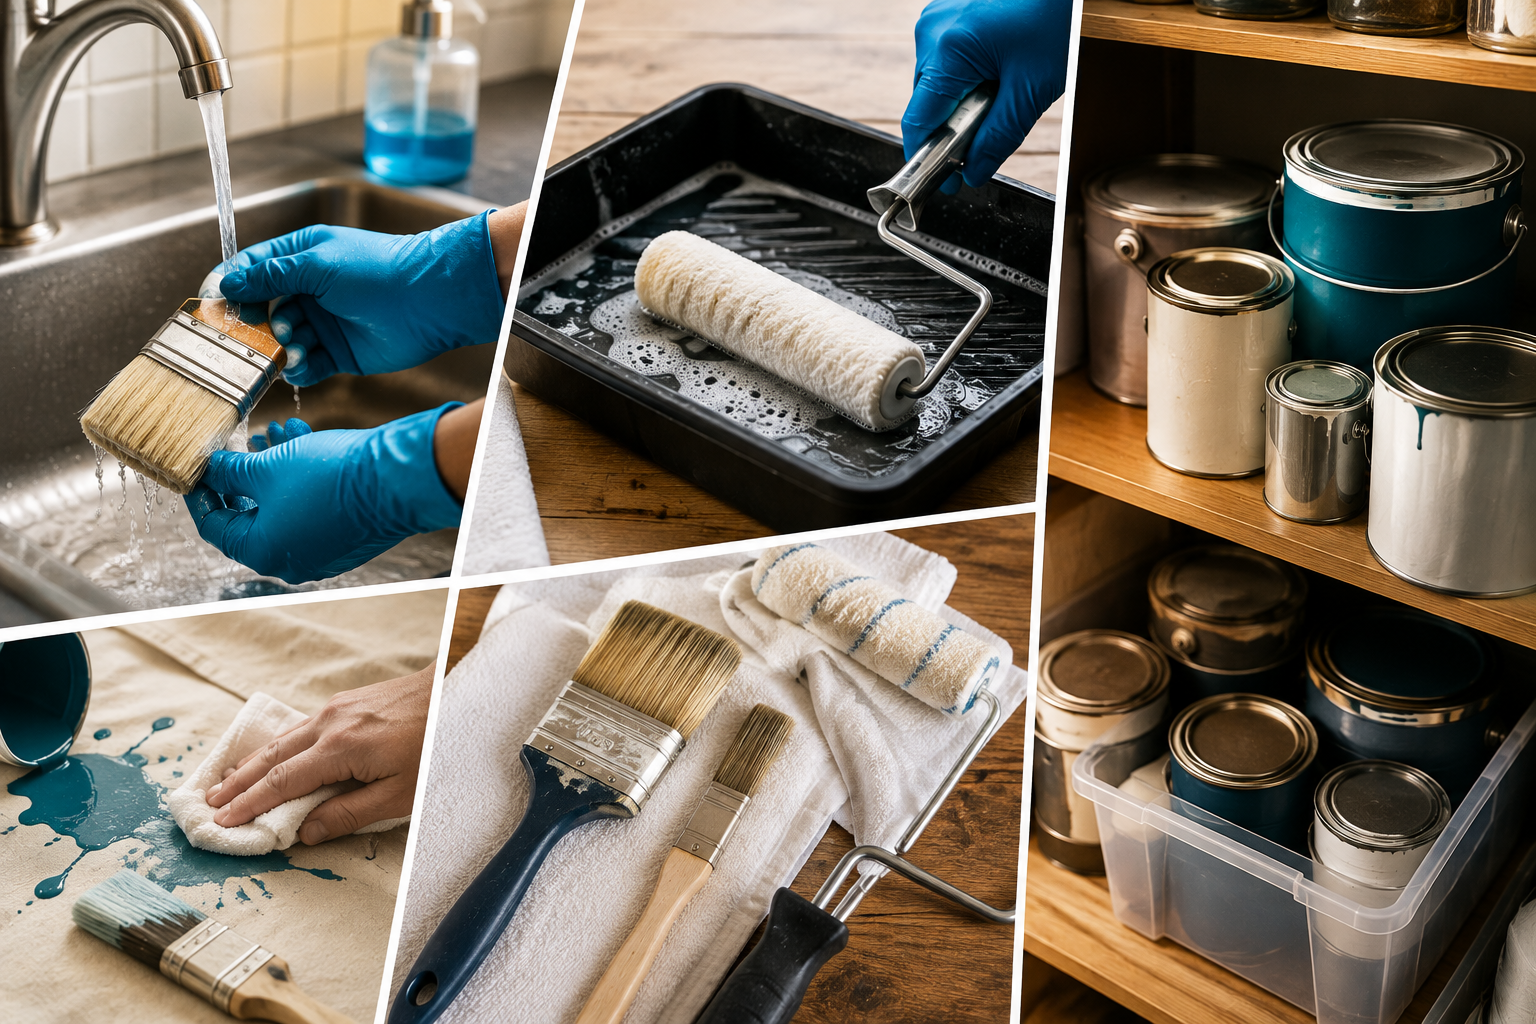
Finishing a paint job is only half the job. What you do afterward, cleaning your tools properly and storing leftover paint correctly, determines whether your brushes survive for next time and whether leftover paint will still be usable for future touch-ups.
This guide covers how to clean paintbrushes, rollers, and spills, along with the best practices for storing leftover paint long-term. We’ll also cover paint disposal, brush care, and practical storage advice for American homeowners wrapping up a painting project.
By the end, you’ll know exactly how to protect your tools and leftover materials, saving money and hassle on your next painting project.
What Matters Most for Cleanup and Storage?
Clean brushes and rollers immediately after use, before paint has a chance to dry, using the appropriate method for water-based or oil-based paint. Store leftover paint in a sealed, properly labeled container in a temperature-controlled space, away from extreme heat or freezing cold, which can degrade paint quality over time.
Following these two core principles protects your investment in both tools and materials, ensuring everything is ready and usable for your next project or touch-up.
Cleaning Paintbrushes
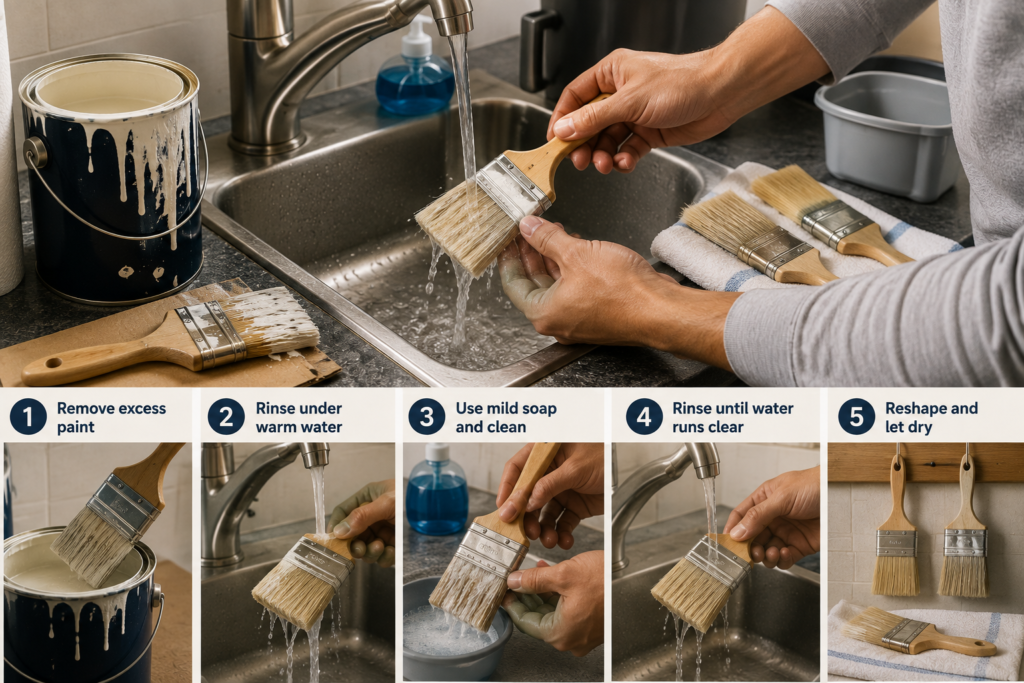
Proper brush cleaning immediately after use is one of the simplest ways to extend the life of your painting tools.
Cleaning Brushes Used with Water-Based Paint
Most interior wall paints are water-based latex, making cleanup relatively straightforward with the right technique.
Steps for cleaning water-based paintbrushes:
- Remove excess paint from the brush by pressing it against the edge of the paint can or a piece of cardboard
- Rinse the brush under warm running water, working the water through the bristles with your fingers
- Apply a small amount of mild soap and work it through the bristles, then rinse thoroughly
- Repeat rinsing until the water runs clear with no visible paint residue
- Reshape the bristles and lay the brush flat or hang it to dry completely
Cleaning Brushes Used with Oil-Based Paint
Oil-based paints require a solvent, such as paint thinner or mineral spirits, since water alone won’t break down the oil-based residue.
Steps for cleaning oil-based paintbrushes:
- Remove excess paint by pressing the brush against the can’s edge
- Dip the brush into a container of paint thinner or mineral spirits, working the solvent through the bristles
- Wipe the brush on a rag to remove loosened paint, repeating with fresh solvent as needed
- Once the brush is mostly clean, wash it with mild soap and water to remove remaining solvent residue
- Rinse thoroughly, reshape the bristles, and allow the brush to dry completely
Storing Brushes Between Coats
If you’re pausing partway through a project and plan to continue within a day, wrap the brush tightly in plastic wrap or a sealed plastic bag to prevent the paint from drying out, rather than fully cleaning it prematurely.
Cleaning Paint Rollers
Rollers require slightly different care than brushes, given their larger surface area and thicker nap.
Cleaning Roller Covers
Remove excess paint by rolling the cover across a paint tray’s ramp or against newspaper before washing. For water-based paint, rinse thoroughly under warm water, working the water through the nap until it runs clear, then squeeze out excess water and allow the cover to dry standing on end.
For oil-based paint, follow a similar process using paint thinner or mineral spirits before a final soap and water rinse, similar to the brush cleaning process described above.
When to Replace Roller Covers
Roller covers are relatively inexpensive and often not worth extensive cleaning once they show signs of matting, shedding fibers, or hardened paint that won’t fully rinse out. In these cases, replacing the cover is often more practical than trying to restore it.
Cleaning Roller Frames and Trays
Wipe down roller frames and trays with a damp cloth after removing excess paint, ensuring no residue remains in tray ridges or on the frame’s cage, which can affect future use if left to dry and harden.
Cleaning Up Paint Spills and Drips
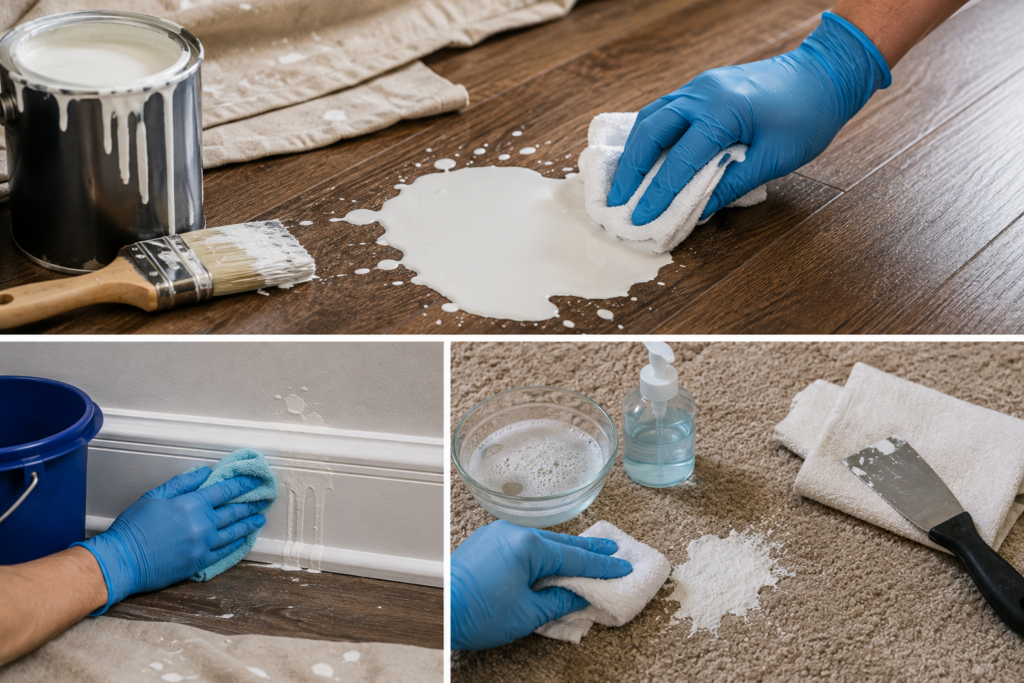
Addressing spills and drips promptly prevents both permanent staining and unnecessary cleanup difficulty later.
Fresh Paint Spills
Wipe up fresh spills immediately with a damp cloth, working from the outside of the spill inward to avoid spreading it further. For carpet or fabric, blot rather than rub, and use a small amount of water and mild detergent for water-based paint.
Dried Paint Spills
Dried water-based paint on hard surfaces can often be softened with warm water and a plastic scraper, taking care not to scratch the underlying surface. Dried oil-based paint typically requires a solvent to soften before scraping away.
Paint on Skin
Warm water and mild soap generally remove water-based paint from skin effectively. Oil-based paint may require a bit of cooking oil or a specialized hand cleaner to help lift the paint before washing with soap and water.
Comparing Cleanup Methods by Paint Type
| Paint Type | Brush/Roller Cleaner | Spill Cleanup |
| Water-based latex | Warm water and mild soap | Damp cloth, mild detergent |
| Oil-based | Paint thinner or mineral spirits, then soap and water | Solvent, then soap and water |
How to Properly Store Leftover Paint
Storing leftover paint correctly keeps it usable for months or even years, making future touch-ups far easier and more cost-effective.
Sealing the Container Properly
Wipe the rim of the paint can clean before sealing, since dried paint along the rim can prevent an airtight seal and lead to the paint drying out or developing a skin over time. Tap the lid down firmly and evenly using a rubber mallet or the flat side of a hammer wrapped in cloth.
Choosing the Right Storage Container
If you have a significant amount of leftover paint, transferring it to a smaller, appropriately sized container reduces the amount of air space inside, which helps prevent the paint from drying out or developing a skin prematurely.
Labeling Your Paint
Label each container clearly with the room, brand, color name or code, sheen, and the date it was purchased or used. This makes future touch-ups far easier, since matching paint without this information can be difficult, particularly if the specific product is later discontinued.
Ideal Storage Conditions
Store paint in a consistent, moderate temperature environment, ideally between 50 and 90 degrees Fahrenheit, avoiding both freezing temperatures and excessive heat, both of which can degrade paint quality and consistency over time. A closet, basement, or garage with reasonably stable temperatures generally works better than an uninsulated shed exposed to extreme seasonal swings.
How Long Does Stored Paint Last?
Properly stored, sealed paint can generally remain usable for several years, though exact shelf life varies by paint type and storage conditions.
- Unopened cans: Can often last many years if stored properly in stable conditions, though it’s still worth checking consistency and smell before using older paint.
- Opened, properly resealed cans: Generally remain usable for one to several years, provided the seal remained airtight and storage conditions were appropriate.
- Signs paint has gone bad: A strong, unpleasant odor, separation that doesn’t recombine with stirring, or a thick, chunky texture all indicate paint that’s no longer suitable for use.
Testing Old Paint Before Use
Before using stored paint for a touch-up, a few simple checks help confirm it’s still in good condition.
- Stir thoroughly: Some settling and separation is normal over time, and thorough stirring often restores a usable consistency.
- Check for odor: A sour or otherwise unusual smell beyond typical paint odor can indicate the paint has begun to break down and shouldn’t be used.
- Test on a small area first: Apply a small amount to an inconspicuous area or scrap material to confirm color match and proper drying before using it more broadly.
Disposing of Paint Properly
When paint is no longer usable or you’re clearing out old cans you no longer need, proper disposal matters both legally and environmentally.
- Check local regulations: Many municipalities have specific guidelines or designated drop-off locations for paint disposal, since paint generally can’t simply go into regular household trash in most areas.
- Dry out latex paint before disposal: Some areas allow fully dried, hardened latex paint to go in regular trash, achieved by leaving the can open in a well-ventilated area or using a paint hardening product.
- Never pour paint down drains: Pouring paint into sinks, toilets, or storm drains can contaminate water systems and is prohibited in most areas.
- Consider donation for usable paint: Some organizations accept gently used, still-viable paint for community projects, offering a practical alternative to disposal for paint you no longer need.
Common Cleanup and Storage Mistakes to Avoid
- Letting brushes and rollers dry with paint still in them: Dried paint is significantly harder to remove and often permanently damages bristles or roller nap.
- Storing paint in extreme temperatures: Both freezing cold and excessive heat can affect paint consistency and performance, shortening its usable shelf life.
- Skipping labels: Unlabeled paint cans make future touch-ups guesswork, particularly once enough time has passed that you no longer remember which can matches which room.
- Sealing a dirty rim: Paint residue along the can’s rim prevents a proper airtight seal, allowing air in and causing the paint to dry out prematurely.
- Pouring paint down the drain: This is both environmentally harmful and illegal in most areas, making proper disposal channels the only appropriate option for unusable paint.
Organizing Your Paint Storage Area
Beyond individual can storage, organizing your overall paint area makes future touch-ups considerably more efficient.
- Group paint by area of the home: Keeping cans organized by room or floor level makes it easier to quickly locate the right can when a touch-up is needed.
- Keep a paint inventory list: A simple written or digital list noting each color, location used, and purchase date provides a quick reference without needing to open and inspect every can.
- Store cans off the ground: Elevating paint cans on a shelf rather than directly on a concrete floor helps protect against temperature extremes and potential moisture issues in basements or garages.
- Keep lids and cans matched: Avoid mixing up lids between different paint cans, since even slight color differences can affect future touch-up accuracy if lids get swapped.
- Dedicate a specific storage zone: Setting aside a consistent shelf or area specifically for paint storage, separate from general household clutter, makes both storage and retrieval far more straightforward over time.
Essential Supplies for Paint Cleanup and Storage
Keeping a small set of supplies on hand makes cleanup and storage tasks considerably easier to manage consistently.
- Mild dish soap: For cleaning water-based paint from brushes, rollers, and skin
- Paint thinner or mineral spirits: For cleaning oil-based paint from tools
- Plastic wrap or sealable bags: For temporarily storing brushes and rollers between coats
- A rubber mallet: For sealing paint can lids evenly without denting the rim
- Painter’s labels or masking tape and a marker: For labeling paint cans with color, room, and date information
- Smaller storage containers: For transferring partially used paint into appropriately sized containers with less empty air space
- A paint can opener: For safely opening sealed cans without damaging the lid’s ability to reseal properly
Having these supplies readily available encourages consistent, proper cleanup habits rather than reaching for whatever happens to be on hand, which often leads to less effective results.
Conclusion
Proper paint cleanup and storage protect both your tools and any leftover materials, saving you money and hassle on future projects. Cleaning brushes and rollers immediately after use, sealing leftover paint tightly, and storing it in stable, moderate conditions all contribute to tools and paint that remain usable for years to come. Taking these final steps seriously turns a good paint job into one that continues paying off well after the last coat has dried.
Frequently Asked Questions
1- Can I reuse paintbrushes without cleaning them between coats?
If you’re continuing within a day, wrapping the brush tightly in plastic prevents drying without requiring immediate cleaning, though full cleaning is still necessary once the project is complete.
2- How long does leftover paint typically last in storage?
Properly sealed and stored paint can often last several years, though it’s worth checking consistency and smell before using paint that’s been stored for an extended period.
3- What’s the best way to store leftover paint?
Seal the container tightly after wiping the rim clean, transfer to a smaller container if there’s significant empty space, label clearly, and store in a stable, moderate-temperature location.
4- Can I pour old paint down the drain?
No, pouring paint down drains is prohibited in most areas due to environmental contamination risks. Check local guidelines for proper disposal methods instead.
5- How do I know if stored paint has gone bad?
A strong, unpleasant odor, separation that won’t recombine with stirring, or a thick, chunky texture all indicate paint that’s no longer usable.
6- What’s the best way to clean oil-based paint from brushes?
Oil-based paint requires a solvent like paint thinner or mineral spirits to break down the residue, followed by a final wash with mild soap and water.